
Read This First: Diagnosing Holster Problems
Most holster problems arise during the first week of real-world use, when everyday movement exposes issues such as printing, discomfort, slow draw, shifting, or weak retention. A simple 7-day test, adjusting one variable at a time, such as belt tension, holster position, ride height, or cant, helps identify the root cause and fix many problems without immediately buying new gear.
This article is a week-one diagnostic you can run before you buy another holster. The goal is simple: identify the root cause of your setup’s misconfiguration, fix what’s fixable, and avoid a drawer full of expensive guesses.
Safety note (non-negotiables): A carry holster must fully cover the trigger guard, securely hold the firearm, and allow safe, consistent reholstering. If a holster collapses, lets the gun shift dangerously, or comes out with the gun during the draw, stop using it.
Related: Your Dry-Fire CCW Tune-Up: 3 At-Home Drills That Actually Carry Over
The Week-One Concealment Test (What to Track and Why It Works)
The fastest way to waste money is “fixing” a holster problem you haven’t identified. Week one is when small issues compound, so you’re going to track a few variables and change only one thing at a time. That turns frustration into clear cause-and-effect.
Your 7-day checklist
Before you start, pick a notebook note, or a phone note and log these:
- Wear time: 2–4 hours early in the week, then a full day by day 5–7
- Clothing: work outfit, casual shirt, jacket/hoodie, and at least one “tighter” option you actually wear
- Activities: sitting/driving 20+ minutes, bending to pick something up, stairs, carrying a bag/groceries, restroom use
- What to note:
- Where it prints (standing vs sitting)
- Where it rubs (exact spot)
- When it shifts (what movement triggers it)
- Whether you get a full firing grip on the draw
- Whether retention feels consistent all day
The one-change rule
Now for the rule that saves your sanity: change one variable per day. Not ride height, cant, and belt tension, just one.
Good order of operations:
- Belt tension
- Holster position (move ½–1 inch)
- Ride height
- Cant
- Concealment aids (claw/wing, wedge/pad)
- Hardware changes (clips/loops)

- Fully Customizable & Universal Fit: Crafted from reliable 500D nylon, this MOLLE gun holster features fully adjustable...
- Tactical Cross-Draw Design & Quick Access: Engineered for rapid response, the versatile cross-draw design accommodates...
- Secure Quick-Release & Heavy-Duty Construction: Built to last with high-strength 500D nylon and 100% polyester...
Last update on 2026-06-08 / Affiliate links / Images from Amazon Product Advertising API
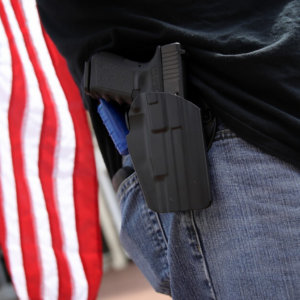
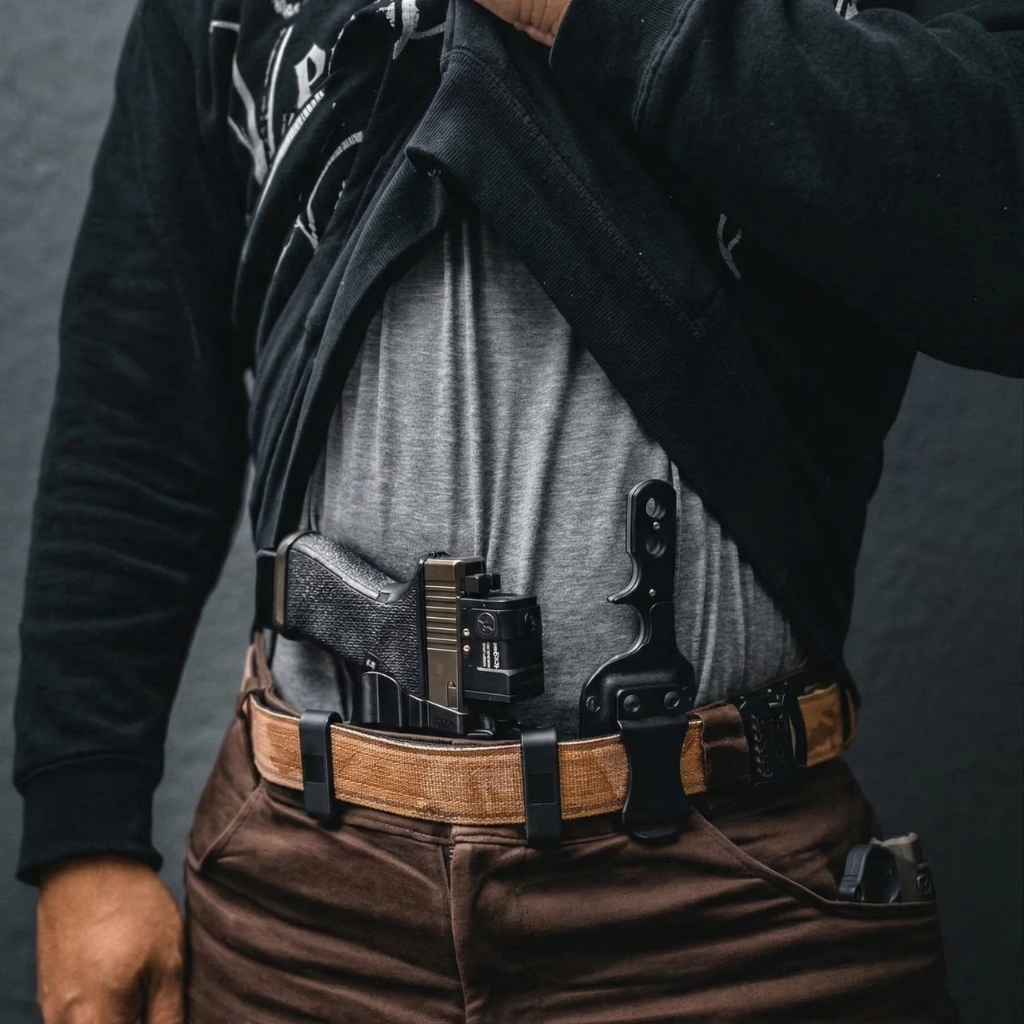
Problem 1: Why Does a Holster Print Through Clothing?
Holster printing usually happens when the grip angles outward from the body due to ride height, belt softness, or holster cant. Adjusting ride height, improving belt stiffness, or adding concealment aids such as a claw or wedge often eliminates printing without requiring a different holster.
Printing usually isn’t about your firearm being “too big.” It’s about how the grip, belt, and holster geometry interact when your body changes shape, especially when you sit or bend. Start here because printing is the #1 reason people quit a setup fast.
Symptoms that show up in week one
- The grip outline shows when you bend or reach
- A noticeable “bump” at the beltline under a T-shirt
- The gun looks fine standing still, then “pops” when seated
Likely causes
- Ride height too high (grip leverages outward)
- Cant mismatch for your carry position
- Belt too soft (lets the holster tilt away from the body
- Missing or ineffective claw/wing (IWB) or wedge (common in appendix carry)
- Carry position not matched to your torso and hip shape
Quick fixes before buying anything
- Lower ride height, one step, and retest sitting and bending
- Adjust cant slightly (strong-side IWB often benefits from a small change)
- Upgrade the belt if it flexes or “rolls” under the holster
- Add a claw/wing (to pull the grip inward) if your holster supports it
- Add a wedge/pad (to tip the grip inward and spread pressure)
When to stop and replace
If your holster can’t accept concealment aids, lacks adjustability, or repeatedly prints across your normal wardrobe after reasonable tuning, it may not match your body or carry position.
Problem 2: Why Do Holsters Create Hot Spots or Pinch Points?
Hot spots usually happen when pressure concentrates on a single point due to incorrect carry position, ride height, or excessive belt tension. Small adjustments, moving the holster half an inch, adding a wedge, or loosening the belt slightly. Often, redistribute pressure and allow a comfortable all-day carry.
Discomfort can be normal at first, but hot spots that worsen every day are a sign of misalignment, pressure concentration, or a setup that requires excessive belt tension. Fixing comfort is often about redistributing pressure, not muscling through it.
Symptoms that show up in week one
- A sore spot on the hip bone, rib, or pelvis
- Inner-thigh pinch (common in appendix carry when seated)
- Raw skin where the holster edge or clip rides
- Pain spikes after driving or long sitting
Likely causes
- Carry position is off by a small amount (½ inch matters)
- Ride height too high or too low for your torso length
- Too much forward cant (or too little) for your hip angle
- The belt is overtightened to “force” concealment
- Holster edge geometry simply doesn’t match your body
Quick fixes before buying anything
- Move the holster ½–1 inch at a time (don’t jump from 1 o’clock to 4 o’clock)
- Adjust ride height to reduce leverage into bone
- Add a wedge/pad to spread pressure and improve the angle
- Try one notch looser on the belt, then improve stability with better clips/loops
- Check clothing fit: tight waistbands amplify discomfort and shifting
When to stop and replace
If you need extreme belt tension to keep the gun stable, or the holster’s edges/hardware consistently create a pressure point that no adjustment fixes, replacing the holster (or choosing a different attachment style) is reasonable.
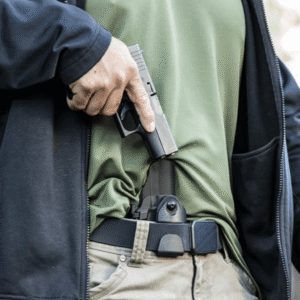
Problem 3: Why Does My Holster Make My Draw Slow or Inconsistent?
Slow draw access usually results from ride height being too low, incorrect cant, or unstable clip placement that allows the holster to roll. Adjusting ride height and clip spacing can improve grip access and consistency without sacrificing concealment.
A holster can conceal great and still be a bad carry solution if you can’t achieve a consistent, safe draw. Week one is when you discover whether you can get a full grip reliably with real clothing, real movement, and real posture.
Symptoms that show up in week one
- You can’t get a full firing grip before the gun leaves the holster
- Cover garment snags repeatedly
- Grip feels buried; your hand hits the belt/clip first
- Draw feels different depending on whether you’re standing or seated
Likely causes
- Ride height too low (hard to access the grip)
- Cant incorrect for wrist alignment
- Clips are placed in a way that allows the holster to roll
- Too much “tuck” for your usual shirts or body shape
Quick fixes before buying anything
- Raise the ride height one step and check if you can consistently get a full grip
- Adjust the cant slightly to improve wrist angle and clearance
- If your holster allows it, spread clips for stability or shift them to reduce roll
- Practice garment clearing safely: unloaded firearm, no live ammo in the room, slow reps only
When to stop and replace
If you cannot get a full grip without compromising safety or concealment, the holster design or carry position may be mismatched for you.

- Sturdy and Reliable: The blade of this small pocket knife is made of high-quality stainless steel, ensuring exceptional...
- Lightweight and Portable: Measuring at a compact 3.94 inches in length and weighing just 2 ounces, this mini box cutter...
- Multi-Usage: Our folding pocket knife is perfect for outdoor activities like hunting,camping,hiking and survival, while...
Last update on 2026-06-09 / Affiliate links / Images from Amazon Product Advertising API
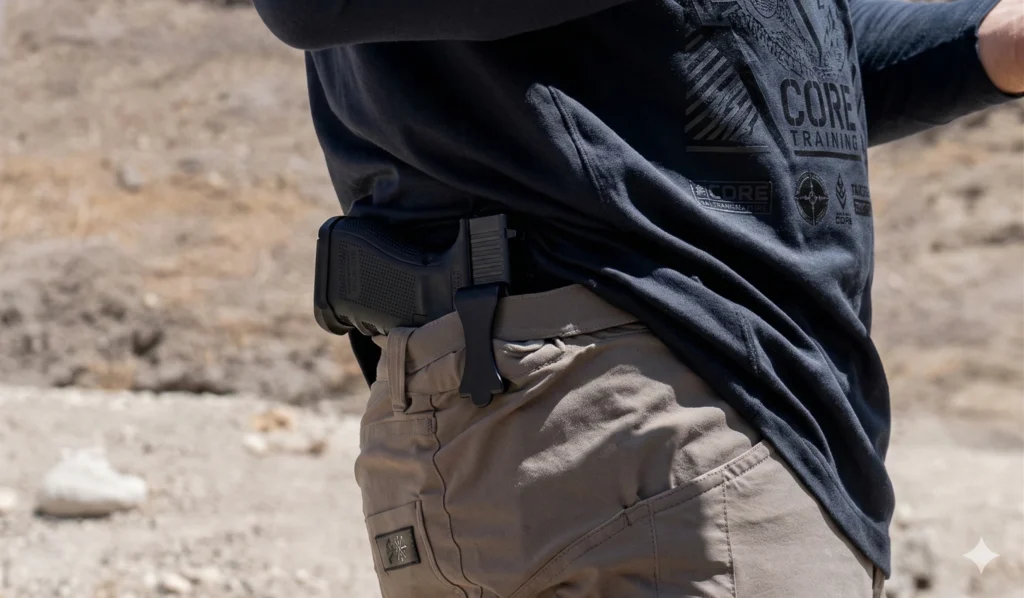
Problem 4: Why Does My Holster Shift or Lose Retention During the Day?
Holster shifting or inconsistent retention usually comes from a flexible belt, improper clip type, loose hardware, or a holster molded for a different firearm configuration. Verifying hardware tightness and matching the holster to the exact gun setup often restores stability.
Stability is a safety and confidence issue. If the holster shifts, your concealment and access change during the day. If retention is inconsistent, you’re not getting the same draw each time. Week one is when movement reveals whether your belt and attachment method are doing their job.
Symptoms that show up in week one
- Holster “walks” around your waistline
- Gun feels looser as the day goes on
- Retention changes after sitting, bending, or sweating
- Holster lifts with the gun during the draw (serious failure)
Likely causes
- Belt too flexible for the load
- Clip type doesn’t match your belt thickness/shape
- Retention not set correctly (or screws backing out)
- Holster not actually molded for your exact setup (light/optic differences matter)
- Attachment points are too narrow for your movement
Quick fixes before buying anything
- Verify the holster is for your exact model/configuration
- Set retention to a consistent standard: secure hold, clean draw (not overly tight)
- Add threadlocker where appropriate (per manufacturer guidance) if screws loosen
- Upgrade belt stiffness or use a more stable attachment style (often dual-clip or loops)
- Retest movement: stairs, bending, getting in/out of a car
When to stop and replace
If the holster ever comes out with the firearm on the draw, stop using it. If retention can’t be made consistent without binding the draw or causing unsafe reholstering, replace it.
Problem 5: How Do Ride Height and Cant Affect Concealment and Comfort?
Ride height and cant control how the firearm grip angles against your body. If the ride height is too high or the cant is incorrect, the grip can lever outward, causing printing, discomfort, and slower draw access. Small adjustments often resolve multiple problems at once.
Many “mystery problems” are actually ride height and cant problems wearing a disguise. If your setup prints and hurts and draws slowly, your adjustments are likely fighting each other. This section helps you find a neutral baseline that makes the other fixes easier.
Symptoms that show up in week one
- Everything feels “almost right,” but never disappears
- Minor improvements in one area create worse issues elsewhere
- You keep tightening the belt because nothing feels stable
Likely causes
- Factory default settings don’t fit your torso length or hip shape
- Carry position doesn’t match your daily posture (desk job vs active job)
- You’re copying someone else’s “best” settings without matching their build
Quick fixes: baseline setups to test
Appendix (AIWB):
- Start with a ride height that allows a full grip without digging when seated
- Use a wedge/pad if needed to reduce muzzle pressure and rotate the grip inward
- Small cant changes can help comfort, but don’t chase extremes on day one
Strong-side IWB (3–5 o’clock):
- Try a modest forward cant to align your wrist and reduce printing
- Adjust ride height so the grip is accessible but not levering outward
- Focus on stability: the holster should not “tip” when you bend
Two-notch method: make one small change, then test seated + bending + reaching. If it improved two of three, keep it and move to the next variable.
When to stop and replace
If your holster lacks enough adjustment range and you’re stuck choosing between “prints” and “hurts,” it’s a design mismatch for your body/carry position.

- Nonwoven Paper Packaging Material-The silica gel desiccant packets are three-side sealing constructed with high quality...
- White Silica Gel Beads & Package Includes-Silica gel packs utilize premium quality and reusable raw material. Desiccant...
- Package Included- 15pcs 20 Gram Silica Gel Packs. Product dimensions of each packet: 2.36" x 4.1";
Last update on 2026-06-08 / Affiliate links / Images from Amazon Product Advertising API
The Fix-First Decision Tree (Stop Buying, Start Diagnosing)
Once you’ve identified your dominant problem, you can decide whether you need tuning, a belt change, different hardware, or a different holster. This keeps you from replacing the wrong part.
A simple decision tree
- If it shifts or prints unpredictably, start with the belt and attachment stability
- If it hurts in one specific spot: adjust position, then ride height, then add a wedge/pad
- If you can’t get a full grip, adjust ride height and clip placement for stability
- If retention changes during the day: confirm correct holster fit, then hardware, then replace
- If multiple problems stack together: reset to a neutral ride height/cant baseline and retest
FAQs
How long should you test a holster before replacing it?
A full week of daily wear usually reveals most concealment issues. Sitting, bending, driving, and normal activities expose printing, shifting, or discomfort that short tests cannot reveal.
Can a better belt fix most holster problems?
Yes. Many concealment problems come from a flexible belt that allows the holster to tilt or move. A stiff carry belt often fixes printing and retention issues.
Should you adjust ride height or cant first?
Start with belt tension and carry position, then adjust ride height. Cant should usually be adjusted last because small-angle changes affect both comfort and concealment.
Common Week-One Mistakes (and What to Do Instead)
A lot of holster frustration comes from reasonable instincts that backfire. Fix these habits, and your “testing” becomes cleaner and faster.
The mistakes that cost the most money
- Overtightening the belt to force concealment (creates pain and instability)
- Changing three variables at once (you never learn what helped)
- Ignoring seated comfort until day five (driving exposes problems fast)
- Blaming the holster for a belt issue (soft belts create shifting and printing)
- Chasing speed before consistent, safe reps (sloppy practice builds bad habits)
What to do instead
- Log one change per day
- Test seated and bending every time
- Treat belt quality as part of the holster system, not an accessory
Before You Buy Another Holster (10-Point Checklist)
This is your “pause button” before another purchase. If you can’t answer these, you’re still guessing.
- What carry position did you test (clock position)?
- Did you test seated comfort for 20+ minutes?
- Do you get a full firing grip every time?
- What ride height setting did you end on?
- What cant setting did you end on?
- Did it print in motion or only standing still?
- Did it shift during stairs/bending?
- Did retention stay consistent all day?
- Did you test with your real daily clothes?
- Is your belt stiff enough to prevent roll and tilt?

- Versatile Storage: Includes one standard-sized box. Perfect for .30 caliber, 9mm, 5.56 ammunition, and more. Great for...
Last update on 2026-06-08 / Affiliate links / Images from Amazon Product Advertising API
Your Holster Didn’t “Fail,” Your Setup Got Tested
Week one is where carry gear meets reality. Printing, hot spots, slow access, weak retention, and frustrating shifting usually aren’t random. They are predictable signals that one or two variables are off: belt stiffness, carry position, ride height, cant, or stability hardware.
Run the 7-day concealment test, change one thing at a time, and you’ll quickly learn whether your holster needs tuning, your belt needs upgrading, or your holster simply isn’t the right match for your body and routine.
Fix Your Setup Before You Buy Again
If you’re about to order “one more holster,” pause and do this instead:
- Re-read the 10-point checklist
- Identify your dominant week-one problem
- Make one adjustment and retest seated + bending
- Only then decide whether you need a new belt, new hardware, or a new holster
Want more concealment troubleshooting? Check our holster and concealed-carry guides for belt fit, carry positions, and safe at-home practice fundamentals.
Check out this video from USCCA on The 3 BEST Concealed Carry Positions:
FAQs
1) Why does my holster feel fine at home but awful after a week?
At home, you stand, adjust, and check a mirror. Real life adds sitting, driving, bending, sweating, and repeated movement that change how the holster rides. Week one exposes leverage, pressure points, and shifting. A simple 7-day test helps you isolate the variable causing the discomfort or printing.
2) Is printing mostly a holster problem or a belt problem?
It’s often both, but a soft belt can create printing even with a good holster. If the belt flexes, the holster tilts outward and the grip “pivots” into your shirt. Before buying a new holster, test a stiffer belt and small ride height and cant adjustments.
3) How tight should holster retention be for concealed carry?
Retention should hold the firearm securely during normal movement, yet allow a clean, consistent draw without jerking. You should not need extreme force to draw, and the gun should not rattle or shift. If tightening retention makes the draw unsafe or inconsistent, the holster may be a mismatch.
4) Why can’t I get a full grip on the draw?
Most commonly, the ride height is too low, so the grip sits buried under the beltline. Cant can also put the grip at an awkward angle, especially under a cover garment. Raise the ride height one step and retest. If you still can’t grip consistently, the holster design may not fit your carry position.
5) How do I stop my IWB holster from shifting during the day?
Start with the belt: a stiff, supportive belt prevents roll and tilt. Next, check attachment style and spacing; dual clips or loops often stabilize better than single points. Confirm the holster is made for your exact gun setup, then adjust retention and hardware. If it still walks, replace.
6) Are wedges and claws safe, and do they actually help concealment?
When used correctly, wedges and claws can improve concealment by rotating the grip inward and reducing the leverage that causes printing. They should never compromise trigger guard coverage, retention, or safe reholstering. Add them gradually, test seated comfort, and keep adjustments modest. If the holster becomes unstable, remove it.
7) What’s the fastest way to fix hot spots without buying a new holster?
Move the holster slightly (½–1 inch), then adjust ride height so it isn’t levering into bone when you sit. If the pressure remains focused, add a wedge or pad to spread contact and improve the angle. Avoid overtightening your belt, which often creates new hot spots and makes shifting worse.
8) When should I stop trying to “make it work” and replace the holster?
Replace the holster if it ever comes out with the gun during the draw, fails to cover the trigger guard fully, collapses and makes reholstering unsafe, or cannot maintain consistent retention. Also consider replacement when normal adjustments cannot solve printing and discomfort without forcing extreme belt tension or awkward carry positions.
9) What’s the safest way to practice the draw at home while troubleshooting?
Use an unloaded firearm, remove all live ammunition from the room, and work slowly with a focus on consistency. Practice clearing the garment, establishing a full grip, and drawing in a controlled manner. Reholster carefully and deliberately. If reholstering feels unsafe or the holster collapses, stop and address the equipment.
When it comes to your daily carry, why is this your go-to? Sound off below👇